LOTUS TOTE free pattern + Picot Hem Bind-off

Happy Friday, friends! I’m glad you stopped by today, because I have a brand new free pattern and knitting tutorial for ya!
Knitted bags has really risen in popularity lately, we may see them popping up on many shoulders this summer. They are comfortable, elegant and add a touch of romance to any outfit. So why not try it for yourself and see how a knitted bag can transform your wardrobe this season?
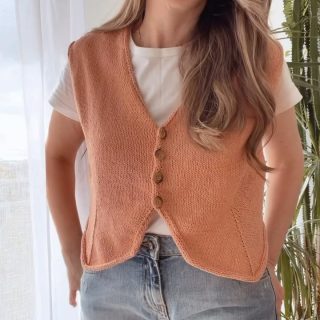
I opted for a tote bag. Versatile and roomy, these bags are perfect for everyday use. When I designed this tote I wanted something in relation with summer sun and blooms, yet a construction where you may easily adjust the length.
So, here comes my Lotus Tote!
The lotus flower has long been a symbol of purity, enlightenment, and rebirth. Its ability to rise gracefully from murky waters to bloom into a stunning blossom resonates with the spirit of summer – a season of growth, renewal, and embracing the beauty around us. With this Lotus Flower Tote Bag, you’ll be carrying a piece of this symbolism wherever you go.
Also, this slouchy bag offers plenty of texture. Casual and fancy it’s perfect for holding all your everyday essentials. The handle is a double knit for extra stability.
The pattern begins with Disappearing Loop cast-on and is worked seamlessly in the round from the bottom up. The base is a lace and the body is a combination of textured openwork and Stockinette Stitch side bands with the top of the picot hem at the cast off edge. It uses a crochet hook to seam up one live edge of knitting to close up the hem creating a decorative, lateral chain finish. The stitches are picked up from the base of the hem above the side band for the strap which is a double knit and attached to opposite side. Finally an I-cord is worked as a drawstring.
If you like it as much as I do, download the pattern below and start making your very own!

Finished Measurements
Approximately 25½ ” /65 cm circumference at widest point and 17¾ ” / 45 cm heigh before blocking
Materials
Approximately 396 yds/ 330 m Salsa by Cheval Blanc (60% Cotton, 40% Acrylic; 120 yds / 100 m = 50 g) or any DK yarn
US 4 / 3.5 mm 16″ / 40 cm circular needle
US 6 / 4 mm double pointed needles and circular needle
US 8 / 5 mm 16″ / 40 cm circular needle
If necessary, adjust needle size to obtain accurate gauge
Size E / 3.5 mm crochet hook (for Picot Hem Bind off)
5 stitch markers (1 in different color for start of round), cable needle (optional), tapestry needle
Gauge
20 sts and 20 rounds = 4″/10 cm in Stockinette Stitch using US 8 / 5 mm needles after blocking
Whilst gauge is not important as the fit is not crucial, changes in gauge will result in size differences and the amount of yarn needed to complete the project.
You are very welcome to knit this bag in a company of other knitters. There is a friendly KAL on my group on Ravelry. Check it here

HOW-TO: Bind-off Row with a crochet hook across the folded Picot Hem
This bind-off combines three things you will certainly love: a picot edge, a hemmed edge, and the ability to do it on the bottom-up knitting. No sewing involved – the edges happen on the needles with a stretchy bind-off. It uses a crochet hook to seam up one live edge of knitting to close up the hem creating a decorative, lateral braid finish.
Learn how to create a picot hemmed edge at the end of your knitting in the video below.
Written instructions below the video.
Create the Picot Hem Bind-off edge
Holding the work facing you, fold the hem at the lace round, with the wrong sides facing each other.
Step 1. With a crochet hook go in the middle of the stitch of the 1st rnd of the hem and into 1st ts on back needle, slip st onto crochet hook and off needle, catch the yarn on the hook and draw the loop to the fabric surface. This creates a loop.
Step 2. Keeping the loop on the crochet hook, repeat once more, picking up in the next st of the same rnd. This creates a new loop.
Step 3. Pull 1st st through 2nd st on the crochet hook.
Repeat steps 1-3 across.
When you have 1 st left on the crochet hook, cut yarn, wrap yarn around the crochet hook and pull tail through remaining st on hook.
TIP: You may use a lifeline across the row below the start of the hem to help showing you the target stitches.
I hope you found this tutorial useful, or at least interesting!
HAPPY KNITTING, Katy